


Every year, thousands of eCommerce brands switch platforms, yet nearly 40% lose significant organic traffic because they mishandle SEO during migration. Search engines don’t forgive broken links or missing metadata, and rankings can vanish overnight.
How To Migrate WooCommerce To Shopify Without Losing SEO isn’t about luck; it’s about following a battle-tested playbook that keeps authority, backlinks, and traffic intact.
Migrating WooCommerce to Shopify Without SEO Loss: The 7-Step Process
Moving your online store from WooCommerce to Shopify can feel overwhelming, especially when you're worried about losing years of SEO progress. The good news? With proper planning and execution, you can preserve your hard-earned search rankings while unlocking Shopify's powerful e-commerce features.
The key to a successful migration lies in meticulous planning, proper redirect implementation, and continuous monitoring. Let's walk through the exact 7-step process that has helped hundreds of stores maintain their organic traffic during platform switches.
Step 1: Pre-Migration SEO Data Collection (1-2 Days)
Before touching anything on your current site, you need to create a complete snapshot of your SEO performance. This data will serve as your baseline and help you identify what's most important to preserve during the migration.
1.1 Export Your Current SEO Performance Data
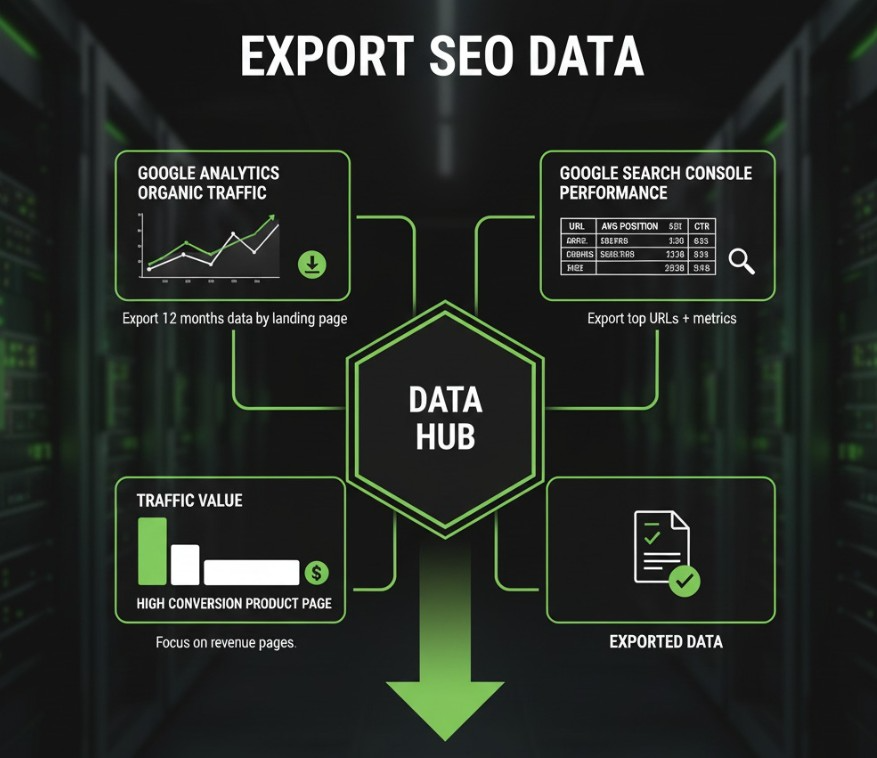
Start by gathering your organic traffic goldmine from multiple sources to understand which pages drive the most value:
- Go to Google Analytics → Acquisition → All Traffic → Channels → Organic Search
- Export the last 12 months of organic traffic data by landing page
- Identify your top 100 pages by organic traffic and conversions
- Navigate to Google Search Console → Performance → Pages
- Export your top-performing URLs with their average positions and click-through rates
Pro Tip: Focus extra attention on pages that generate revenue, not just traffic. A product page with 100 monthly visitors but high conversion rates is more valuable than a blog post with 1,000 visitors and no sales.
1.2 Create a Complete URL Inventory
This step ensures you don't miss any important pages during the redirect setup. Use professional tools to get a comprehensive view of your site structure:
- Install Screaming Frog SEO Spider (free version handles 500 URLs)
- Crawl your entire WooCommerce site using your domain
- Export all URLs, page titles, meta descriptions, and H1 tags
- Document your current URL structure patterns:
- Products: /product/product-name/
- Categories: /product-category/category-name/
- Blog posts: /blog/post-title/
The free version of Screaming Frog works perfectly for most small to medium stores. If you have more than 500 pages, consider the paid version or break your crawl into sections.
1.3 Document Critical SEO Elements
Create a master spreadsheet that will become your migration roadmap. This document should capture every SEO element that contributes to your current rankings:
- Create columns: Old URL, Page Title, Meta Description, Target Keywords, Monthly Traffic, Current Ranking Position
- Note your most valuable pages (top 20 by traffic/revenue)
- Save copies of your current XML sitemap from /sitemap.xml
Example: If your "Blue Running Shoes" product page ranks #3 for "comfortable running shoes" and drives $5,000 monthly revenue, mark it as high priority with specific notes about preserving its exact title and meta description.
Step 2: Set Up Your Shopify Store Foundation (1 Day)
Now it's time to build your new Shopify home with SEO-first thinking. Every configuration choice you make here will impact your search performance, so attention to detail is crucial.
2.1 Create Shopify Account & Choose Plan
Setting up your Shopify foundation properly from day one saves countless headaches later. Make strategic choices that support your SEO goals:
- Sign up for Shopify at shopify.com
- Choose an appropriate plan (Basic $29/month minimum recommended for SEO apps)
- Select "I'm already selling online" during setup
- Choose WooCommerce as your previous platform
Shopify's onboarding process will offer theme recommendations based on your WooCommerce site. While helpful, prioritize themes with strong SEO foundations over visual similarity.
2.2 Configure Basic SEO Settings

These fundamental settings create the SEO backbone of your new store. Get them right from the start to avoid future complications:
- Go to Settings → General → Search engine listing preview
- Set your store title: "Your Brand Name - What You Sell"
- Write meta description (155 characters max)
- Navigate to Online Store → Preferences
- Set homepage title and meta description
- Enable "Automatically generate a sitemap file"
Critical Note: Your homepage title and meta description should match or improve upon your current WooCommerce settings. Don't change winning formulas without good reason.
2.3 Install Essential SEO Apps
Shopify's app ecosystem fills crucial SEO gaps that the platform doesn't handle natively. These three apps form your essential SEO toolkit:
- Install "Plug in SEO" app for on-page optimization
- Install "JSON-LD for SEO" for structured data markup
- Install "TinyIMG" for image optimization and redirect management
Start with free versions of these apps during migration, then upgrade based on your specific needs. Too many apps can slow down your site, so be selective.
Step 3: Plan Your URL Structure & Redirect Strategy (1-2 Days)
This step determines whether you keep your SEO juice or watch it drain away. URL structure changes are inevitable when switching platforms, but smart planning minimizes the impact on your rankings.
3.1 Map WooCommerce URLs to Shopify URLs

Create a redirect mapping spreadsheet that will become your lifeline during the technical implementation. This document needs to be absolutely perfect:
- Column A: Old WooCommerce URL (e.g., /product/blue-widget/)
- Column B: New Shopify URL (e.g., /products/blue-widget)
- Column C: Redirect Type (301 for all)
Common URL Pattern Changes:
- /product/name/ → /products/name
- /product-category/category/ → /collections/category
- /blog/post-name/ → /blogs/news/post-name
Pro Tip: Keep product names (slugs) identical when possible. If your WooCommerce product slug was "comfortable-running-shoes," use the same slug in Shopify to maintain URL similarity and reduce SEO disruption.
3.2 Handle Special Cases
Not every page fits standard patterns, and these edge cases often cause the biggest SEO problems if overlooked. Plan for these scenarios before they become issues:
- For discontinued products: Redirect to similar products or category pages
- For changed product names: Ensure the new slug matches the SEO-friendly format
- For blog posts: Maintain the same slug structure if possible
Consider creating a "discontinued products" collection for products you no longer sell but that still receive search traffic. This preserves some SEO value while guiding users to alternatives.
Step 4: Migrate Your Data While Preserving SEO Elements (2-3 Days)
The actual data migration is where SEO preservation meets technical execution. Choose your migration method based on your technical comfort level and store complexity, but never compromise on SEO element preservation.
4.1 Choose Your Migration Method
Option A: Use Matrixify (Recommended)
Matrixify offers the most comprehensive migration with built-in SEO preservation features. For a complete comparison, check our analysis of the best WooCommerce to Shopify migration tools available
Matrixify offers the most comprehensive migration with built-in SEO preservation features:
- Install the Matrixify app in your Shopify store
- Generate WooCommerce API credentials (WooCommerce → Settings → Advanced → REST API)
- Create a new key with Read permissions
- In Matrixify, connect to WooCommerce using the API
- Select data to migrate: Products, Categories, Customers, Orders
- Critical: Enable "Create redirects for products and collections"
- Run the migration
Option B: Manual CSV Method
For smaller stores or those wanting complete control over the process:
- In WooCommerce admin, go to WooCommerce → Products
- Click Export → Select "All product fields"
- Format the CSV to match Shopify's import template
- Convert WooCommerce "product_cat" to Shopify "Product Type"
- Map "post_title" to "Title" and "post_excerpt" to "Body (HTML)"
The manual method takes longer but gives you granular control over every field mapping. Choose this if you need custom data transformations.
4.2 Preserve SEO Meta Data During Migration
This is where many migrations fail - overlooking critical SEO elements that took months or years to optimize. Pay special attention to these elements:
- Ensure product titles remain exactly the same (if they were ranking well)
- Transfer meta descriptions to Shopify's "Search engine listing preview" fields
- Map WooCommerce categories to Shopify collections
- Preserve image alt text and filenames
- Transfer custom fields as Shopify metafields
Example: If your WooCommerce product had a custom field for "Material: 100% Organic Cotton" that helped with search rankings, make sure this information transfers to Shopify metafields and appears in your product descriptions.
Step 5: Set Up 301 Redirects in Shopify (1 Day)
Redirects are your SEO lifeline; they tell search engines where your content has moved and transfer most of your ranking power to the new URLs. Get this wrong, and you'll watch your traffic disappear overnight.
5.1 Bulk Import Redirects
Shopify's bulk redirect system makes it easy to implement hundreds of redirects at once. Follow this exact process to avoid costly mistakes:
- In Shopify Admin, go to Online Store → Navigation
- Click "URL Redirects" at the bottom
- Click "Import" and download the CSV template
- Fill in your redirect mapping from Step 3
- Import the CSV file
Critical Warning: Test your CSV with a few redirects first. One formatting error can break hundreds of redirects, and fixing them individually is time-consuming.
5.2 Critical Redirect Rules
These non-negotiable redirects handle the most common URL pattern changes between WooCommerce and Shopify:
- Product pages: /product/name/ → /products/name
- Categories: /product-category/name/ → /collections/name
- Blog: /blog/post/ → /blogs/news/post
- Search page: /search/ → /search
Don't redirect your homepage if you're keeping the same domain; it's unnecessary and can cause confusion for both users and search engines.
5.3 Test Key Redirects
Manual testing catches issues that automated tools might miss. This step prevents embarrassing broken links and SEO disasters:
- Manually test your top 20 most valuable page redirects
- Use redirect checker tools to verify they return 301 status codes
- Ensure no redirect chains (A→B→C); each should go directly to the final destination
Use tools like "Redirect Path" Chrome extension or httpstatus.io to quickly test multiple redirects and identify any issues before launch.
Step 6: Preserve Internal Linking & Site Structure (1 Day)
Internal links distribute SEO authority throughout your site and help users discover related products. Rebuilding this structure properly ensures your new Shopify store maintains its search engine visibility.
6.1 Rebuild Internal Link Architecture
Your internal linking strategy needs complete reconstruction on the new platform. Focus on maintaining the flow of authority to your most important pages:
- Update all internal links in product descriptions to use new Shopify URLs
- Update blog post internal links to point to new product/collection pages
- Create related product sections using Shopify's native features
- Set up cross-selling and upselling links in product templates
Pro Tip: Use your analytics data to prioritize internal link updates. Focus first on links from high-traffic pages to high-converting products; these have the biggest SEO and business impact.
6.2 Implement Shopify-Specific SEO Features

Shopify offers unique SEO opportunities that WooCommerce doesn't have natively. Take advantage of these platform-specific features:
- Enable breadcrumb navigation in your theme
- Set up collection descriptions with target keywords
- Configure product variant SEO (if applicable)
- Add FAQ sections to product pages using schema markup
Collection descriptions are particularly powerful in Shopify; they act like category pages in WooCommerce but offer more flexibility for SEO optimization.
Step 7: Launch & Monitor SEO Performance (Ongoing)
Launch day is just the beginning of your SEO preservation journey. Careful monitoring and quick response to issues determine whether your migration succeeds or becomes a ranking disaster.
7.1 Pre-Launch Checklist
Before flipping the switch, verify that every critical system is working perfectly. One overlooked item can undo weeks of careful preparation:
- Test all critical page redirects manually
- Verify Google Analytics 4 is properly installed
- Confirm Google Search Console property is set up for the new structure
- Test site speed using Google PageSpeed Insights
- Ensure the SSL certificate is active and working
Launch Day Success Metric: Your top 10 most important pages should load quickly, track properly in analytics, and redirect correctly from old URLs.
7.2 Launch Day Actions
The moment you go live, several time-sensitive actions ensure search engines understand your site changes as quickly as possible:
- Switch DNS to point to Shopify (if using a custom domain)
- Submit new XML sitemap to Google Search Console: yourdomain.com/sitemap.xml
- Test 10-20 random product pages to ensure they load correctly
- Monitor real-time traffic in Google Analytics
Expected Results: Within 24 hours, you should see Google beginning to crawl your new Shopify URLs in Search Console. Traffic drops are normal initially but should recover within a few days.
7.3 Post-Launch Monitoring (First 30 Days)

The first month determines your long-term SEO success. Daily monitoring catches issues while they're still fixable and prevents small problems from becoming major disasters:
- Daily: Check Google Search Console for crawl errors
- Daily: Monitor top 20 keyword rankings using SEMrush/Ahrefs
- Weekly: Compare organic traffic to pre-migration levels
- Weekly: Fix any 404 errors by adding missing redirects
Success Benchmarks: By day 7, you should see 80%+ traffic recovery. By day 30, aim for 95%+ recovery with improved page speeds.
Expected Timeline & Results
Total Migration Time: 7-10 days for the complete process
SEO Recovery Time: Rankings should stabilize within 2-4 weeks
Traffic Recovery: Expect 90-95% traffic retention if redirects are properly implemented
Performance Improvement: Most stores see 20-30% faster page load times
The investment in careful migration planning pays dividends in maintained search visibility, improved site performance, and reduced long-term maintenance headaches.
Your SEO Authority Can Thrive, Not Just Survive, After Migration
A platform switch doesn’t have to cost you rankings, traffic, or hard-earned authority. By auditing your data, preserving metadata, implementing 301 redirects, and monitoring performance, you can make the switch smoothly while even boosting site speed and conversions.
For enterprise stores that can’t afford SEO risks, professional support makes all the difference; explore expert WooCommerce to Shopify migration services from Velt2 to ensure your move is seamless and search-friendly.
%20(1).jpg)

.jpg)
%20(1).jpg)