

Magento is powerful, but it can also feel like managing a server farm with duct tape. If you're scaling up or simplifying, learning how to migrate a Magento store to Shopify is a smart move.
This guide walks you through the complete process - clearly, efficiently, and without tech overwhelm, so you can shift platforms with confidence and preserve everything that matters: your data, your brand, and your growth.
Magento to Shopify Migration: 9 Steps to Switch Platforms While Preserving Your Rankings
Migrating from Magento to Shopify doesn't have to be a nightmare. Follow this proven 9-step blueprint, and you'll seamlessly transfer your entire store while preserving your hard-earned SEO rankings and customer data.
This comprehensive process typically takes 2-8 weeks, depending on your store's complexity.
Step 1: Pre-Migration Planning and Audit – Your Safety Net
Think of this step as building your migration insurance policy. Before touching a single line of code, you need to create a complete safety net for your business.
Backup Your Magento Store Completely
Your first priority is creating a bulletproof backup of everything. Navigate to your Magento admin panel and go to System > Tools > Backups. Create three types of backups:
- System Backup: Captures your entire system, including source code and database
- Database Backup: Preserves all your store data and configurations
- Media Backup: Secures all product images and media files

Pro Tip: Store these backups in multiple locations - your server, cloud storage, and local drive. You can never be too careful with your business data.
Conduct a Comprehensive Data Audit
Before migrating anything, you need to know exactly what you have. This audit prevents costly surprises later:
- Product Catalog Analysis: Count your products, variants, and categories. Note any complex configurations or custom attributes.
- Customer Data Review: Assess your customer database size and identify VIP customers who need special attention.
- Order History Assessment: Document your order volume and identify any orders with special fulfillment requirements.
- Content Pages Inventory: List all your CMS pages, blog posts, and static content that needs migration.
Choose Your Shopify Plan Wisely
Your plan choice impacts your migration strategy. Here's the breakdown:
- Shopify Basic ($39/month): Perfect for stores under 1,000 orders monthly
- Shopify Standard ($105/month): Ideal for growing businesses needing advanced reporting
- Shopify Advanced ($399/month): Best for high-volume stores requiring detailed analytics
- Shopify Plus ($2,300+/month): Enterprise solution for stores processing 10,000+ orders monthly
Clean Up Your Magento Data
Migration is the perfect time for spring cleaning. Remove outdated products, duplicate customer records, and broken links. Clean data migrates faster and performs better on your new Shopify store.
Step 2: Data Export from Magento - Gathering Your Digital Assets
Now it's time to extract your valuable business data from Magento. This step requires precision to ensure nothing gets lost in translation.
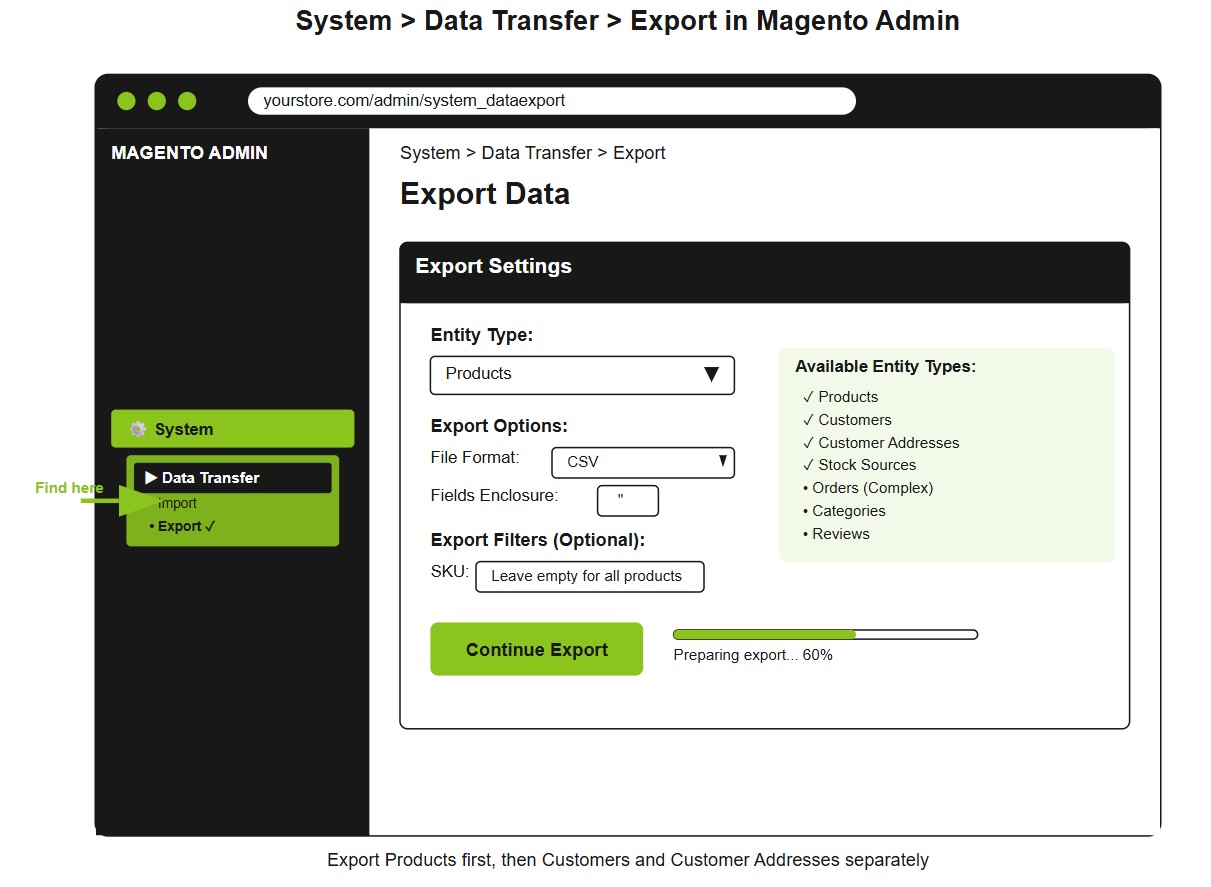
Export Your Products Systematically
Navigate to System > Data Transfer > Export in your Magento admin. Export products in manageable batches if you have a large catalog. The CSV file will include:
- Product names, SKUs, and descriptions
- Pricing information and special prices
- Basic attributes and categories
- Stock levels and weight data
Export Customer Information Safely
Customer data is your business's lifeblood, so handle it with extreme care. Your export should include:
- Main customer file (names, emails, registration dates)
- Address files (billing and shipping addresses separately)
- Customer groups and newsletter subscriptions
- Remember: Customer passwords cannot be migrated for security reasons
Handle Orders with Special Attention
Order export is the trickiest part of Magento migration. Focus on these key elements:
- Recent orders (last 6-12 months for most businesses)
- Order status and payment information
- Shipping details and customer notes
- Consider using specialized tools like Matrixify for complex order data
Secure Your Media Assets
Download all product images from your /media folder. These require special handling:
- Product images (main and additional images)
- Category images and banners
- CMS page media files
- You'll need direct server access or hosting provider assistance
Preserve Your SEO Gold
Export your meta titles, descriptions, and URL structures - this SEO data represents years of optimization work:
- Meta titles and descriptions for all pages
- URL keys and redirects
- Alt text for images
- Losing this information could devastate your search rankings
Step 3: Choose Your Migration Method - Your Path to Success
The method you choose determines your migration's success, timeline, and stress level. Here are your three main options:
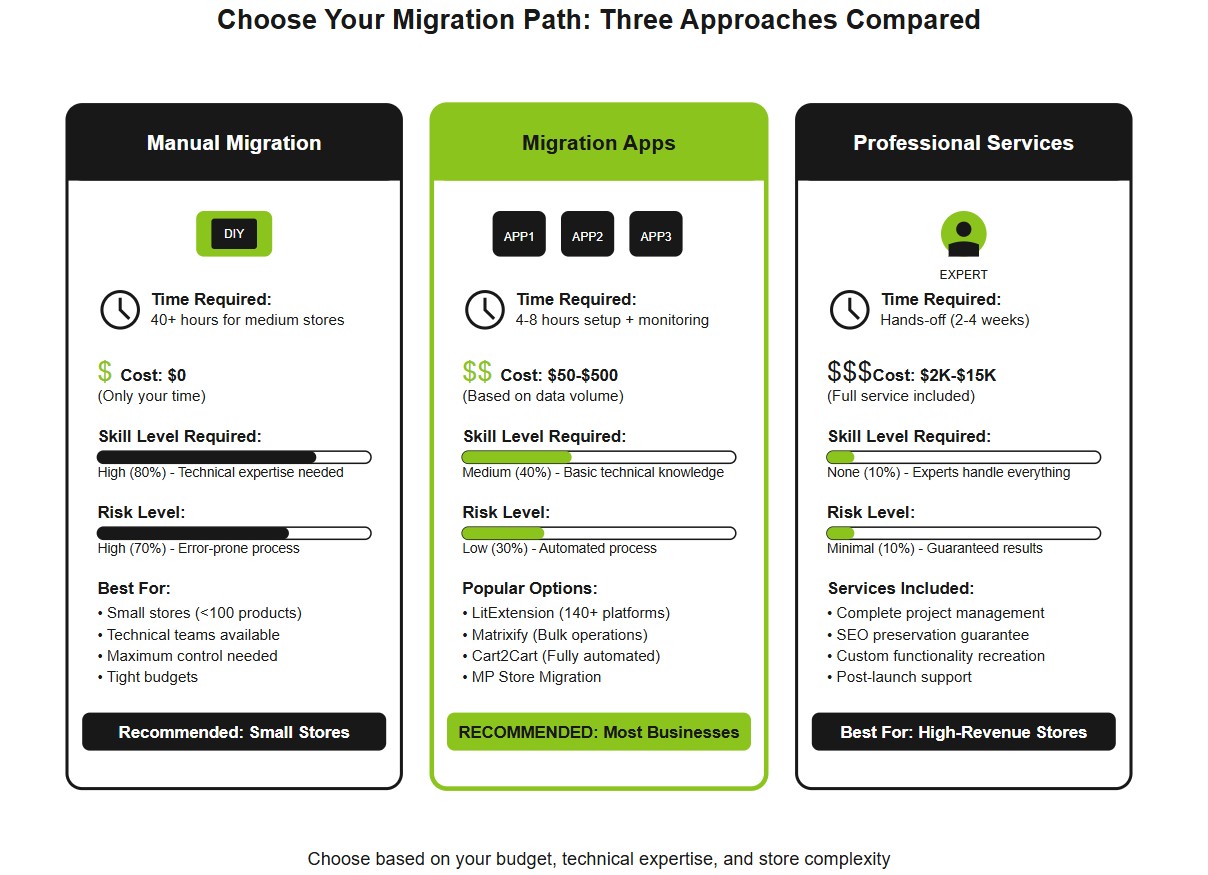
Manual Migration: The DIY Approach
Best for: Small stores under 100 products with technical expertise available.
- Complete control over every aspect of the migration
- No additional costs beyond your time investment
- Time-intensive process requiring 40+ hours for medium stores
- Error-prone without proper technical knowledge
Migration Apps: The Smart Middle Ground
Most businesses choose this route because it balances cost, control, and convenience:
- LitExtension: Supports 140+ platforms with free demos. Perfect for complex stores needing custom field mapping
- Matrixify: Handles massive files (up to 20GB) and excels at bulk operations. Ideal for inventory-heavy businesses
- Cart2Cart: Fully automated with zero technical requirements. Great for non-technical store owners
- MP Store Migration: Offers zero-downtime migrations with guided workflows. Best for businesses that can't afford any sales interruption
Professional Migration Services: The Premium Route
When your store generates significant revenue, considering expert Magento to Shopify migration services becomes worthwhile.
- Guaranteed results with expert SEO preservation
- Complete project management from start to finish
- Custom functionality recreation and optimization
- Expect to pay $2,000-$15,000, depending on complexity
Step 4: Data Import and Transfer - Making the Move
This is where your careful planning pays off. Follow Shopify's import order religiously: Products first, then customers, then orders. This sequence ensures proper data relationships.
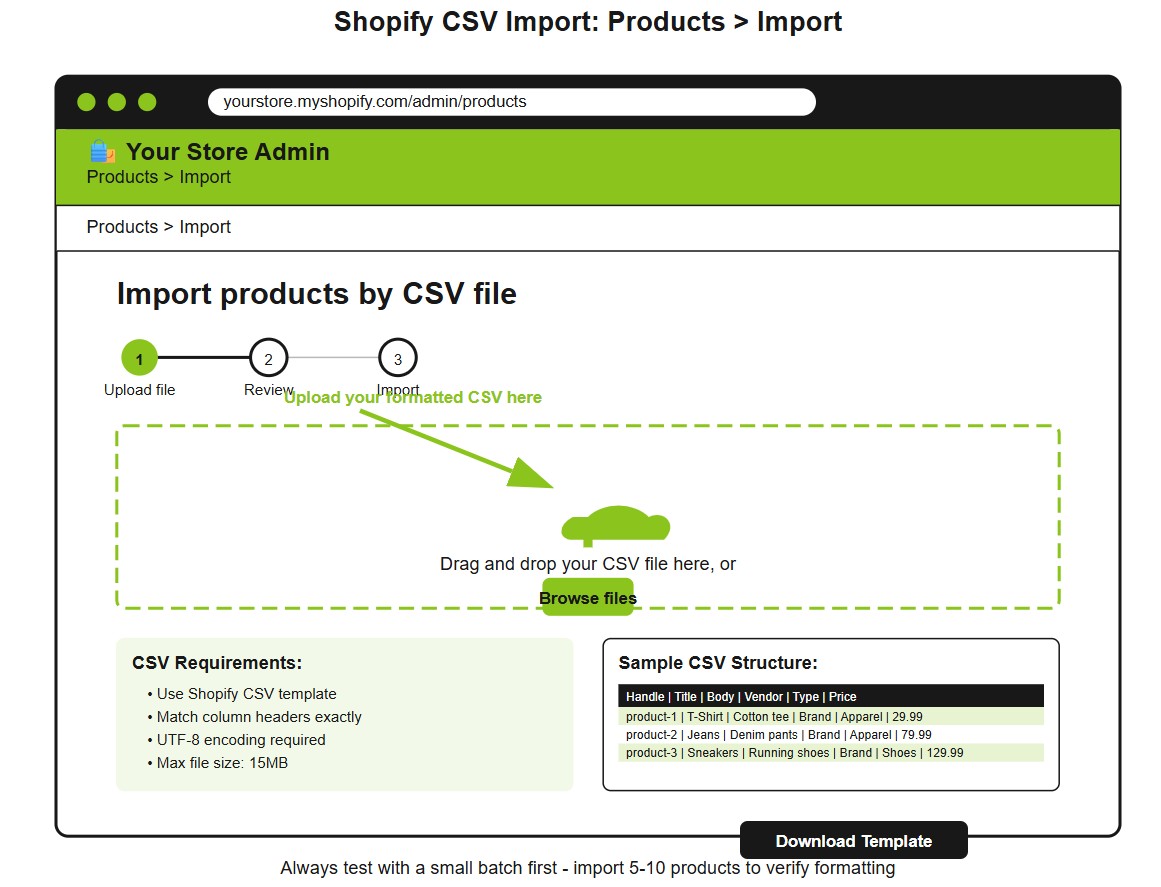
Format Your CSV Files Perfectly
Download Shopify's official CSV templates from their help documentation. Proper formatting prevents costly import failures:
- Match column headers exactly to Shopify's requirements
- Clean up special characters that might break imports
- Verify data types (numbers as numbers, text as text)
- Test with small batches before importing your entire catalog
Map Magento Data to Shopify Fields
Mismatched fields cause import failures, so map your Magento columns precisely:
- Product titles and descriptions transfer directly
- Categories become collections in Shopify
- Custom attributes may need restructuring as product tags
- Price formatting must match Shopify's decimal requirements
Handle Shopify's Variant Limitations
Critical limitation alert: Shopify allows a maximum of 99 variants and 3 options per product:
- Audit your complex products before migration
- Split products exceeding variant limits into multiple listings
- Restructure options (size, color, material) to fit within limits
- Plan alternative solutions for highly customizable products
Import Images and Media Files
Visual content requires special handling in Shopify:
- Upload images to Shopify before importing product data
- Use public URLs in your CSV files for image references
- Optimize image sizes for faster loading (under 20MB each)
- Maintain image quality while reducing file sizes
Verify Data Accuracy Post-Import
After each import batch, verify the data accuracy immediately:
- Check prices and inventory levels for accuracy
- Review product descriptions for formatting issues
- Test product variants and option combinations
- Catching errors early saves hours of corrections later
Step 5: Theme and Design Migration - Your Store's New Look
Magento themes don't work on Shopify. This limitation is actually an opportunity to modernize your store's design and improve user experience.
Why Magento Themes Don't Work on Shopify
Understanding the technical differences helps set proper expectations:
- Different templating languages (PHP vs Liquid)
- Incompatible file structures and naming conventions
- Unique database architectures require different approaches
- This forces a fresh start with modern, mobile-optimized designs
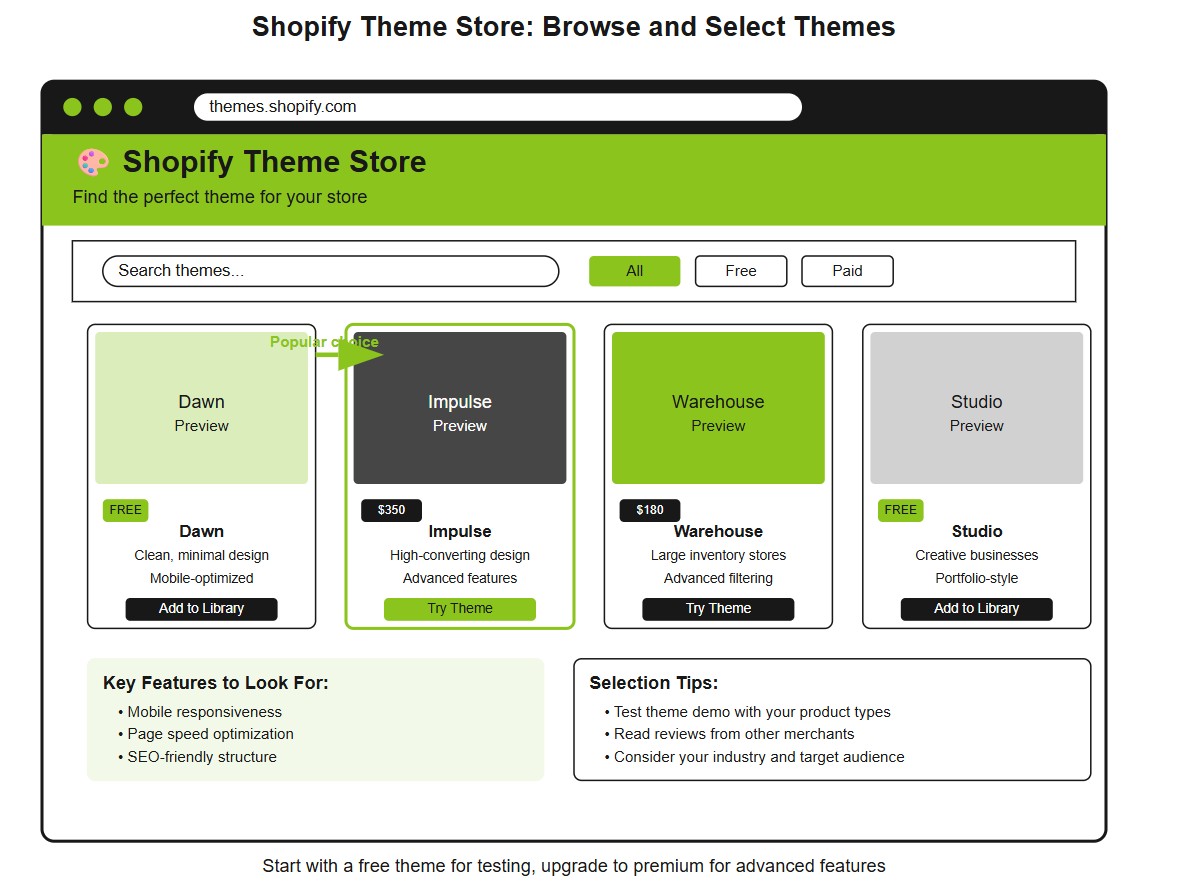
Choose a High-Converting Shopify Theme
Browse Shopify's theme store and select a theme that matches your brand aesthetic:
- Free themes offer solid functionality for basic stores
- Premium themes ($150-$350) provide better customization options
- Consider conversion optimization features like quick view and mega menus
- Read reviews and check demo stores before purchasing
Customize Theme to Match Brand
Maintain brand consistency during your design transition:
- Upload your logo and brand colors immediately
- Customize fonts to match your existing brand guidelines
- Recreate key design elements that define your brand identity
- Test brand recognition with existing customers during soft launch
Recreate Custom Functionality with Shopify Apps
Map your Magento customizations to Shopify apps:
- Search the App Store for functionality replacements
- Test apps thoroughly before committing to paid plans
- Consider app costs in your ongoing operational budget
- Apps replace custom code and provide ongoing updates and support
Mobile Optimization Considerations
Mobile-first design is non-negotiable in today's market:
- Test on multiple devices and screen sizes
- Optimize touch interactions for mobile users
- Ensure fast loading on mobile networks
- Shopify themes are mobile-responsive by default, but customization can break this
Step 6: Set Up SEO and 301 Redirects - Protect Your Rankings
This step determines whether your migration succeeds or destroys your organic traffic. Proper redirects are non-negotiable for SEO preservation.
Critical Importance of 301 Redirects for SEO Preservation
Understanding why redirects matter motivates proper implementation:
- Preserve link equity from years of SEO work
- Maintain search rankings during platform transition
- Prevent 404 errors that frustrate customers
- Signal to Google that the content has permanently moved
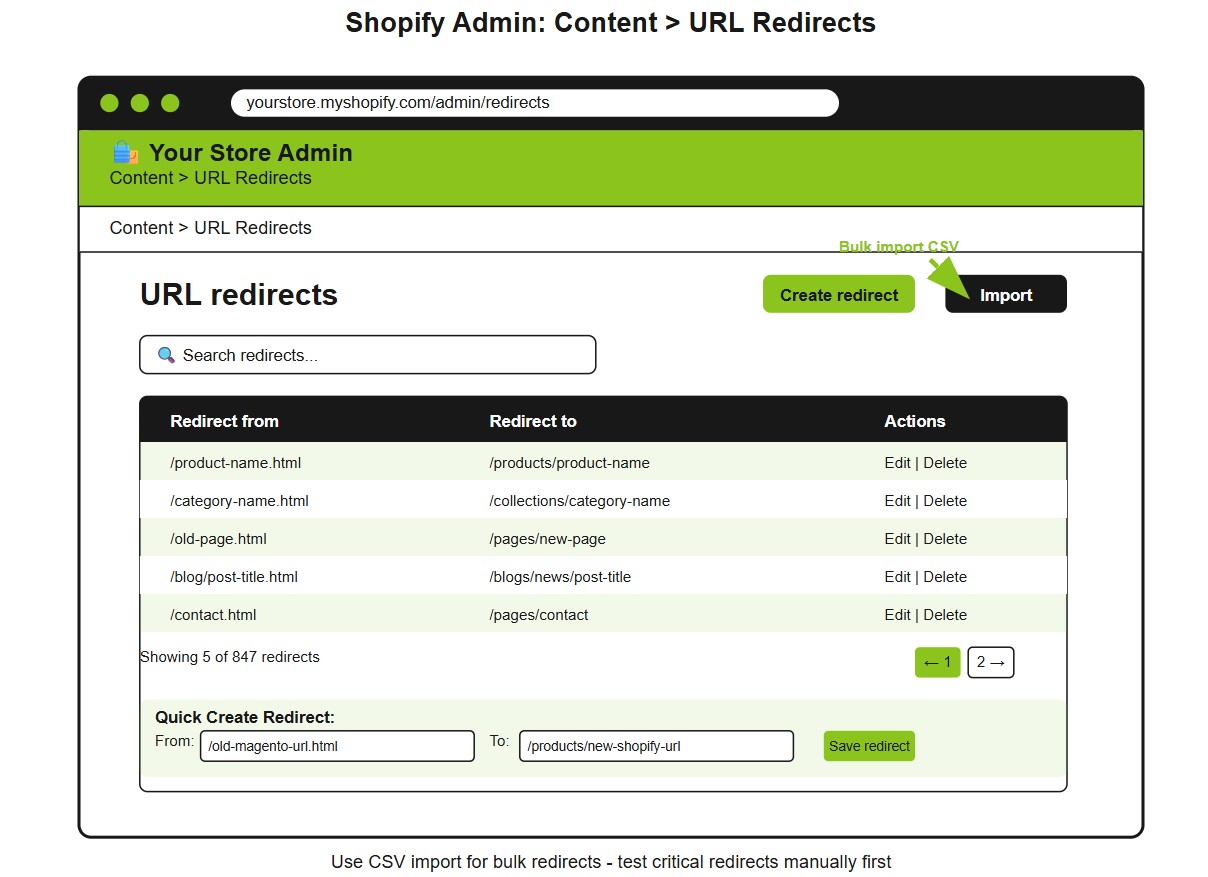
Understand URL Structure Differences
Magento and Shopify use completely different URL structures:
- Magento Products: yourstore.com/product-name.html
- Shopify Products: yourstore.com/products/product-name
- Magento Categories: yourstore.com/category-name.html
- Shopify Collections: yourstore.com/collections/category-name
Create URL Mapping Spreadsheet
Build a comprehensive spreadsheet mapping every important URL:
- Export all URLs from your Magento sitemap
- Match each old URL to its new Shopify equivalent
- Prioritize high-traffic pages and money-making products
- Don't skip any pages – even a few missing redirects can cost traffic
Implement Redirects in Shopify
Navigate to Content > URL Redirects in your Shopify admin:
- Import redirect lists using Shopify's CSV template for bulk uploads
- Test each redirect manually for critical pages
- Use wildcard redirects for pattern-based URL changes
- Monitor redirect performance with Google Search Console
Transfer Meta Data Completely
Copy every meta title, description, and alt text from your Magento store:
- Product meta information for SEO continuity
- Category and collection descriptions for better rankings
- Image alt text for accessibility and image search
- This optimization work represents significant SEO value
Set Up Google Search Console Verification
Verify ownership of your new Shopify store immediately:
- Add verification code to your theme's header
- Submit new sitemap (automatically generated at yourstore.com/sitemap.xml)
- Monitor crawl errors and fix issues promptly
- Track ranking changes during the transition period
Submit New Sitemap
Help search engines discover your new structure:
- Shopify auto-generates XML sitemaps at yourstore.com/sitemap.xml
- Submit to Google Search Console and Bing Webmaster Tools
- Monitor indexing progress and troubleshoot any issues
- Remove old sitemaps from search consoles after successful migration
Step 7: Domain and DNS Configuration - Going Live
Your domain setup determines your store's accessibility. Plan this step carefully to minimize downtime and ensure smooth customer access.
Domain Transfer Considerations
Decide whether to transfer or point your domain:
- Domain transfer gives you complete control within Shopify
- DNS pointing keeps your domain at the current registrar
- Consider email dependencies before making changes
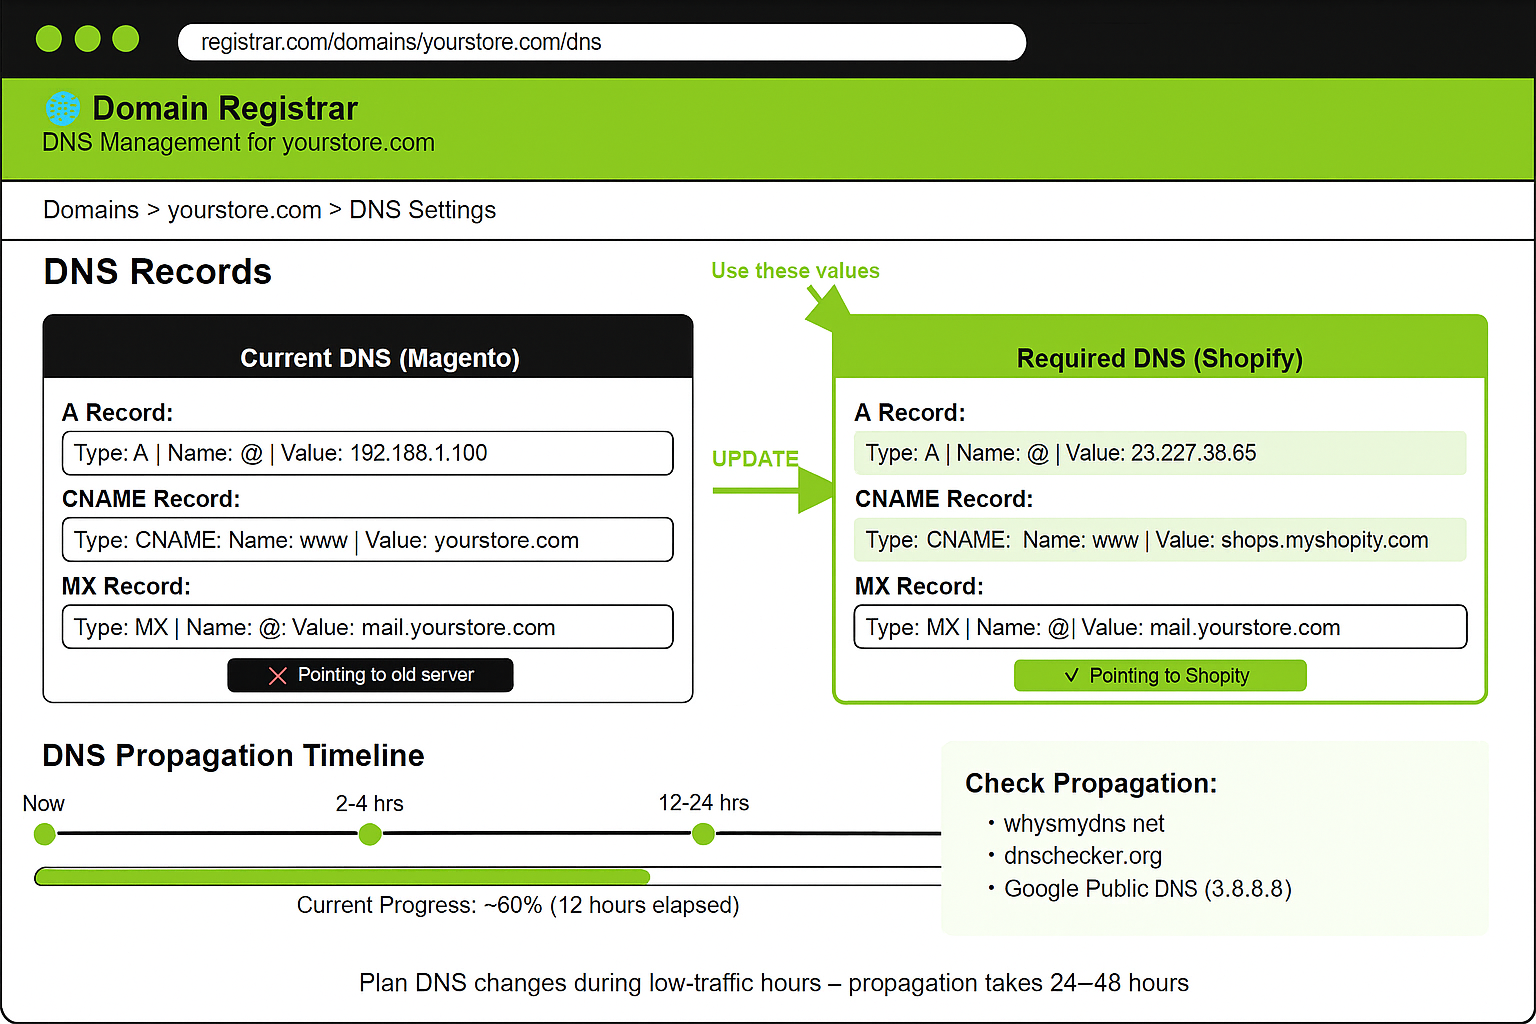
- Plan for a 24-48 hour propagation time
DNS Setup and Propagation
Update your DNS settings to point to Shopify's servers:
- Change A records to point to Shopify's IP addresses
- Update CNAME records for subdomains if needed
- Monitor propagation using online DNS checker tools
- Have a rollback plan if issues arise during transition
SSL Certificate Configuration
Secure transactions are mandatory for customer trust:
- Shopify provides free SSL certificates for all stores
- Automatic activation usually takes 24-48 hours
- Test secure pages before announcing your launch
- Configure SSL certificates immediately to ensure secure transactions
Email Forwarding Setup
Maintain email continuity during your transition:
- Set up email forwarding from your domain to personal accounts
- Test email functionality before going live
- Consider Google Workspace or a similar service for professional email
- Document email settings for future reference
Step 8: Testing and Quality Assurance - Your Final Safety Check
Test everything before customers see your new store. Comprehensive testing prevents embarrassing launches and lost sales.

Functional Testing Checklist
Create a comprehensive checklist covering all store functions:
- Navigation menus and internal links work correctly
- Search functionality returns accurate results
- Product filters and sorting options function properly
- Shopping cart adds, removes, and updates items correctly
Cross-Browser Compatibility
Ensure your store works across all major browsers and devices:
- Test on Chrome, Firefox, Safari, and Edge
- Check mobile browsers on iOS and Android
- Verify functionality rather than just visual appearance
- Use tools like BrowserStack for comprehensive testing
Mobile Responsiveness Testing
Mobile traffic often exceeds desktop, so mobile testing is critical:
- Test on multiple screen sizes (phones, tablets)
- Verify that touch interactions work smoothly
- Check page loading speeds on mobile networks
- Ensure the checkout process is mobile-friendly
Payment Gateway Testing
Process test transactions with real payment methods:
- Test all payment options you plan to offer
- Verify tax calculations for different locations
- Check refund processing capabilities
- Ensure PCI compliance is maintained
Shipping Configuration Testing
Accurate shipping is crucial for customer satisfaction:
- Test shipping calculations for various zones
- Verify delivery options and timeframes
- Check international shipping if applicable
- Test free shipping thresholds and promotions
Performance Testing
Page speed affects both SEO and conversions:
- Check page load speeds using Google PageSpeed Insights
- Optimize images that slow down page loading
- Test under different network conditions
- Performance issues cost sales and search rankings
Step 9: Go Live and Post-Migration - The Big Moment
Choose your launch timing strategically, and avoid peak shopping periods unless absolutely necessary.
Final Pre-Launch Checklist
Complete these critical tasks before switching your DNS:
- Verify all redirects are working correctly
- Test payment processing one final time
- Check inventory levels and product availability
- Confirm staff training on the Shopify admin
Soft Launch vs Full Launch
Consider a staged approach to minimize risk:
- Soft launch with limited traffic to test performance
- Invite select customers for feedback and testing
- Monitor for issues before the full public announcement
- Full launch after confirming everything works perfectly
Monitor Traffic and Redirects
Keep your old Magento domain live for at least 180 days while monitoring:
- Track 404 errors religiously using Google Search Console
- Monitor traffic patterns for unusual drops
- Watch conversion rates for performance issues
- Set up alerts for critical metric changes
Keep Old Domain Live
Maintain your safety net during the transition period:
- 180-day minimum for domain retention
- Monitor both old and new traffic sources
- Gradual traffic shift indicates a successful migration
- Don't cancel old hosting until traffic fully transitions
Track 404 Errors and Fix Immediately
Broken links damage both SEO and user experience:
- Use Google Search Console for error monitoring
- Set up automated alerts for new 404 errors
- Fix missing redirects within 24 hours of discovery
- Document common patterns to prevent future issues
Post-Launch Optimization
Submit your new sitemap to Google Search Console and monitor your rankings:
- Rankings may fluctuate for 2-4 weeks post-migration
- Some fluctuation is normal as Google adjusts
- Significant drops require immediate attention
- Track key performance metrics daily during transition
Following this 9-step blueprint ensures a successful migration that preserves your business continuity, customer relationships, and search rankings. Take your time with each step; rushing leads to costly mistakes that can take months to fix.
Confidently Step Into Shopify With Zero Regrets
Migrating from Magento to Shopify is more than a platform switch - it’s a strategic upgrade for your business. By following this step-by-step process, you’ve protected your data, preserved your SEO, and positioned your brand for scalable growth.
Whether you did it manually or with expert help, you now have a clean, optimized Shopify store ready to perform. Keep testing, keep optimizing, and most importantly, keep building. Your next chapter starts now.
%20(1).jpg)

.jpg)
.jpg)